Dye migration is a common challenge in screen printing, especially when working with polyester fabrics and plastisol inks. This in-depth guide will explain what dye migration is, why it happens, and how to prevent it – with a special focus on Monarch Color plastisol inks and their low-bleed, low-cure formulations. We’ll cover everything from curing temperature control to using underbases and blocker inks, as well as best practices for printing on tricky materials like 100% polyester, poly-blends, and sublimated garments.
Whether you’re new to screen printing or just looking to improve your results, these tips will help you achieve vibrant prints without the dreaded dye “bleeding” ruining your work. Let’s dive in!
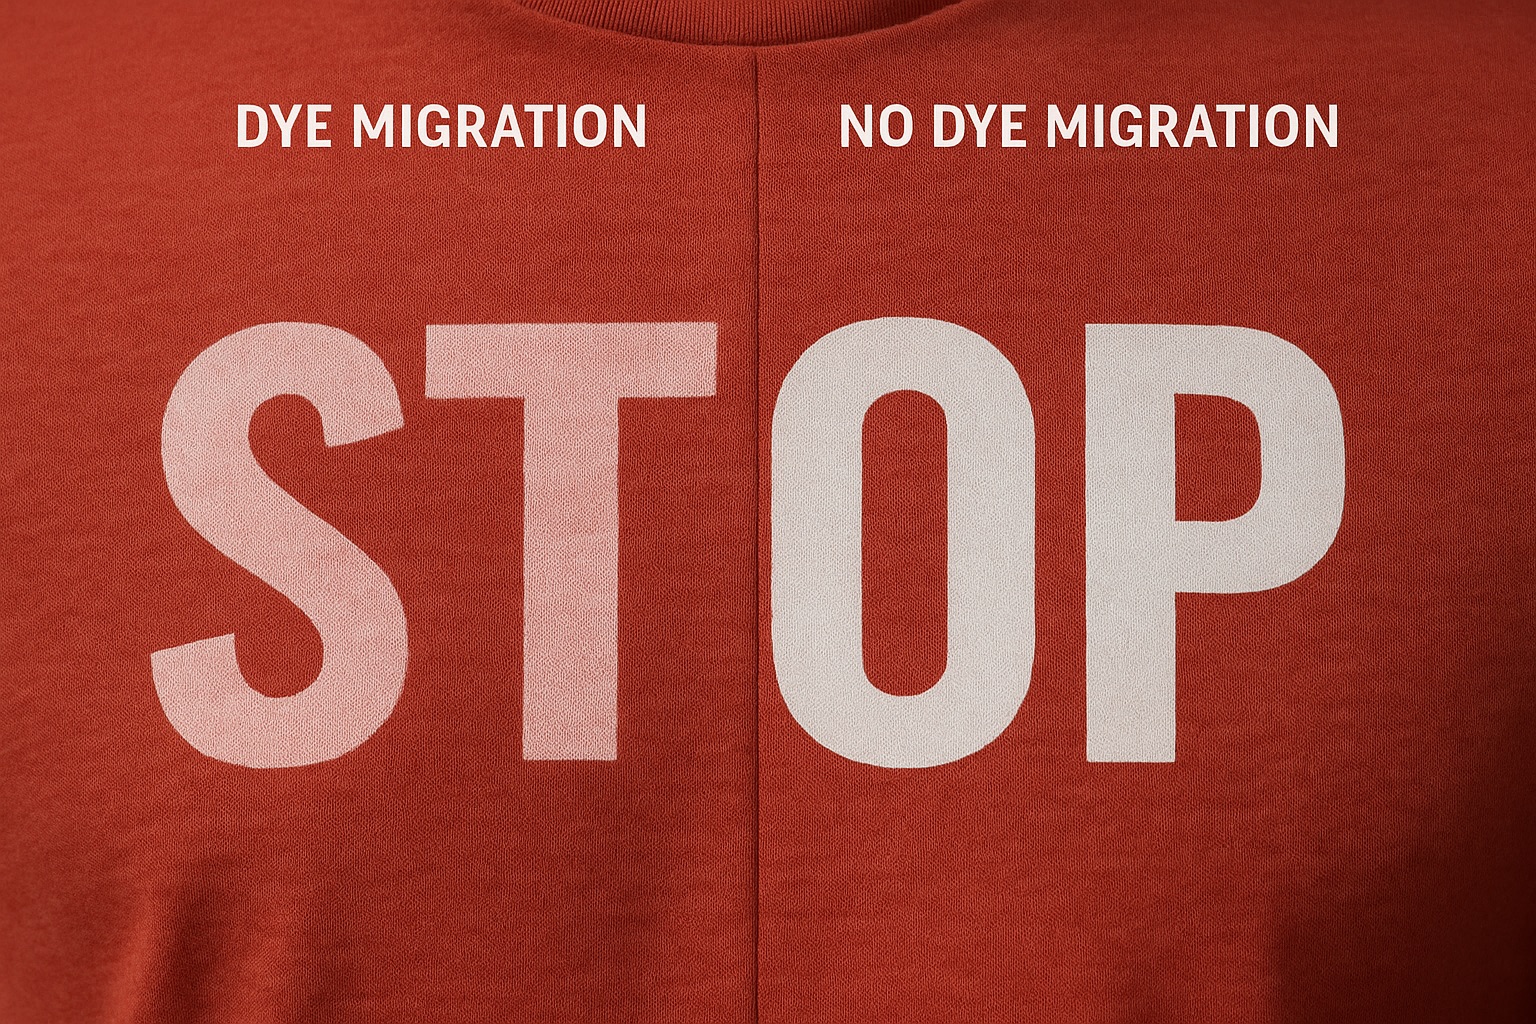
What is Dye Migration (and Why Does It Happen)?
Dye migration (also known as bleeding) is the movement of dye from a dyed fabric into the ink printed on that fabric. In simple terms, the garment’s color leaches into your ink, causing discoloration. For example, if you print white plastisol ink onto a red polyester shirt and it turns pink after curing, that’s dye migration. It’s a frustrating problem that can make bright inks look muddy or off-color.
An example of dye migration: A white print on a red polyester shirt has turned pink due to the red fabric dye bleeding into the ink.
Why does this happen? The culprit is heat. Plastisol inks typically need to be cured (heated) to about 320 °F (160 °C) to fully fuse and set on the garment. However, many polyester and poly-blend fabrics are dyed with heat-sensitive dyes that begin to sublimate (turn to gas) and release color at around 260–280 °F. This means by the time you’ve cured the ink, the fabric’s dye has also been heated enough to migrate into it. The ink’s plasticizer can actually pull those dye molecules up into the ink layer, resulting in a color shift. Lighter ink colors (like white, yellow, or pastels) on dark polyester are especially prone to showing this effect, since even a small amount of dye can tint them.
A tricky aspect of dye migration is that it’s not always immediately visible. The print might look fine right after curing, but a few hours or days later the ink suddenly appears discolored as the dyes continue to diffuse. This delayed bleed can catch printers off guard, so it’s important to use preventive measures whenever you’re working with at-risk fabrics.
Common fabrics prone to dye migration:
- 100% Polyester: Particularly sports apparel (uniforms, jerseys) and performance wear. These are often dyed with sublimation or disperse dyes that easily gas-out under heat.
- Poly/Cotton Blends: 50/50 shirts, 65/35 blends, tri-blends, etc., can bleed too (though generally less than pure poly). The polyester portion of the fabric can still cause migration on light ink colors.
- Sublimated or Printed Polyester: Fabrics that have a printed pattern (e.g. camouflage or graphics applied via sublimation) are very prone to re-releasing those dyes when reheated. For instance, printing on a sublimated camo polyester hoodie can result in the camo pattern ghosting through your ink if not properly blocked.
- Heavily Dyed Colors: In practice, garments in vibrant or dark colors (red, maroon, black, navy, purple, etc.) tend to be the worst offenders. Lighter fabric colors (white, light gray, pastels) don’t have much dye to bleed, and cotton fabrics generally don’t have this issue at all. If you must print light ink (like white) on a red or other rich-colored polyester, assume dye migration will happen and take precautions.
Now that we know what causes dye migration, let’s look at how to control it. The good news is ink manufacturers like Monarch Color have developed specialized plastisol inks and methods to keep those pesky dyes at bay.
Curing Temperature Control: Heat is Your Enemy (Time is Your Friend)
One of the most important factors in preventing dye migration is controlling your curing temperature and time. As mentioned, excessive heat is the trigger that drives dye out of polyester fibers. Therefore, your goal is to cure the ink at the lowest temperature that still fully fuses the print.
- Use Low-Cure Plastisol Inks: Monarch Color and other manufacturers offer low-temp curing plastisol inks formulated for polyester. By curing at a lower temperature (e.g. 270–280 °F instead of 320 °F), you stay below the threshold where most polyester dyes sublimate. For example, Monarch’s special low-temperature inks cure around 280 °F while maintaining strong adhesion. Their newest ULT3 series white ink cures as low as 270 °F – significantly reducing the risk of activating the garment dye. Using these inks means you don’t have to heat the shirt as much, which in turn greatly lessens dye migration risk. (As a bonus, lower curing temps can also save energy and prevent polyester fabric from scorching or shrinking.)
- Avoid Overheating – More Heat = More Bleed: Even with low-bleed inks, cranking the dryer too hot or running shirts through too slowly can defeat the purpose. In fact, too much heat in the curing process can overcome any low-bleed ink’s ability to block dye migration. It’s better to err on the side of a slightly lower temperature and a bit more time in the dryer, rather than blasting the garment with excessive heat. In other words, heat is your enemy and time is your friend in this process. Monarch’s technical docs advise using a lower oven temperature with a slower belt speed, so the ink still reaches cure but the garment isn’t exposed to extreme heat spikes. For instance, you might cure a low-temp ink at 280 °F for 1.5 minutes instead of 320 °F for 45 seconds. The ink gets fully cured, but the fabric stays cooler.
- Monitor Your Dryer Settings: Be sure to use a thermometer or heat probes to verify the actual temperature your shirts reach in the dryer. Don’t rely solely on the dial setting. You want the ink film to hit the recommended cure temp (say 270–280 °F for a low-temp ink) but not go far beyond it. Consistency is key – avoid hot spots or spikes above your target. It can help to set the oven a little below the ink’s max cure temp (to account for momentum in the heating) and use longer dwell time if needed.
- Flash Cure with Care: When printing multi-layer designs (like a white underbase with colors on top), you will likely flash cure the underbase layer. Keep those flash units in check! Only flash until the ink is just dry to the touch (gelled), not fully cured. Avoid excessive flash temperature or time, as over-flashing can start driving dye out of the fabric before the final cure and can also cause inter-coat adhesion problems. A good rule: if the underbase feels extremely hot or sticky after flashing, you’ve overdone it. Reduce the flash time or temperature. A quick, moderate flash is enough – you just want the underbase stable enough to print the next color without smearing.
By mastering temperature control, you tackle the root cause of dye migration. Monarch’s low-cure plastisol inks give you a big advantage here, since they are designed to cure at temperatures below the dye-release point. Next, we’ll look at the inks themselves and how their formulations help fight bleed.
Low-Bleed and Bleed-Blocking Inks: Your First Line of Defense
Beyond temperature control, the ink formulation plays a huge role in resisting dye migration. Standard plastisol ink (made for cotton) typically isn’t equipped to block polyester dyes. This is why ink manufacturers offer “low-bleed” or polyester inks that are specifically made to prevent dye migration.
What makes an ink “low-bleed”? These inks contain special dye blockers and/or curing agents that either physically block the dye or chemically resist it. For example, some low-bleed plastisols include compounds that create a barrier in the ink film, so the dye can’t easily penetrate. Others might use slightly different resin systems that cure at lower temperatures or “lock” faster, giving the dye less time to migrate. Often, the pigment load is higher too – a more opaque ink layer helps cover the fabric and hide any slight bleed that does occur.
It’s important to note: “Low-bleed” is not “no-bleed.” Extremely bad fabrics can sometimes bleed through anything. (As seasoned printers say, there’s really no such thing as a 100% bleed-proof ink.) Still, using a quality low-bleed ink can significantly reduce the chances of migration. Here are some tips regarding low-bleed inks, with Monarch Color’s products as a prime example:
- Use Inks Designed for Polyester: Always choose an ink line that is advertised for polyester or low-bleed performance when printing on poly garments. Monarch’s Apocalypse series and ULTRA Low Temp series are good examples. The Monarch Apocalypse plastisol inks are marketed as “low-cure, low-bleed” solutions for challenging fabrics (poly, blends, etc.), providing vibrant prints “without the risk of dye migration” on even difficult substrates. These inks have exceptional opacity and superior adhesion, which together help keep dye migration to a minimum. Likewise, Monarch’s “Polywhite” inks (ULT series) are high-bleed-resistant formulations that create a robust barrier on polyester.
- Monarch’s Low-Bleed Ink Lines: For a beginner, it helps to know the Monarch product names to look for:
- Apocalypse LB Mixing System – A full range of mixable colors that are Low-Bleed (LB) and low-cure (around 280 °F). This means you can mix Pantone-matched colors that are safe for polyester printing. The inks are creamy and high opacity, so you often get great coverage in one pass.
- Yeti ULT White (Ultra Low Temp) – Monarch’s flagship poly white ink. ULT stands for ultra-low-temperature cure. For example, Yeti ULT II White can cure as low as 270–280 °F while offering excellent dye blocking. It’s designed to be stretchy, extremely opaque, and highly bleed resistant – ideal for athletic apparel and 100% poly fabrics. Printers often praise that it’s a “very bright” white with a soft, creamy feel (not the thick, armor-like patch some poly inks create).
- ULT3 White – This is Monarch’s third-generation low-temp poly white, recently released. It cures at about 270 °F and is formulated for the most bleed-prone polyester (even sublimated poly). It’s soft-hand, short-bodied (easy to print), and has “excellent bleed-blocking” according to Monarch. Essentially, it’s the latest upgrade to the ULT series for maximum dye migration defense.
- Vivid LB Series (Stark White, etc.) – Monarch also has the Vivid line for general use which includes low-bleed versions of standard inks. For example, Stark White LB is a high-opacity white that cures at standard temperature (320 °F) but has some bleed resistance for use on poly-blends. These are great for everyday printing on cotton and 50/50 shirts. However, for 100% poly or severe bleed situations, the low-cure inks (Apocalypse/ULT) are usually more effective.
- Follow the Instructions: Low-bleed inks sometimes have special instructions. Monarch’s tech sheet notes, for instance, that you should avoid mixing in additives or other inks into their low-bleed formulas, as it can diminish their ability to block dye. Use them as-is for best results. Also, ensure you fully stir the ink before use – plastisol can thicken over time, and a good stir gets it creamy (Monarch’s inks are known for a smooth, creamy viscosity out of the can). A creamy ink will print more easily and lay down an even, thick layer which helps stop migration.
- Opacity Matters: A highly opaque ink not only looks brighter, but it also helps with migration. The thicker and more solid the ink deposit, the harder it is for garment dye to push through. Monarch’s inks are formulated to be very opaque – often one hit of white is enough to cover dark fabric. This is great for bleed control because a single opaque layer gives less opportunity for dye to seep than multiple thin passes. (If you do need two passes, you can print-flash-print a low-bleed white to build up a thicker layer.)
In short, using the right low-bleed plastisol ink is your first line of defense against dye migration. Monarch Color has poured a lot of R&D into making inks that cure low and block dyes so that even beginners can print on poly with confidence. But inks are only part of the equation – your technique in using them also matters, especially when it comes to underbases and specialty blockers for the most challenging garments.
Using Underbases and Blocker Whites (When and How)
Sometimes, just using a low-bleed ink isn’t enough – especially for “problem garments” like sublimated polyester or very intense fabric colors. In these cases, screen printers often rely on an underbase or a blocker ink layer as an extra barrier.
What’s an underbase? It’s essentially a first layer of ink (usually white or gray) that you print on the shirt and cure (or flash) before printing your actual design colors on top. The underbase serves two purposes:
- Brightness/Opaqueness: It provides a neutral, opaque background so that the colors printed on top are vibrant (this is why underbases are used on dark shirts in general).
- Barrier to Dye: In context of dye migration, a properly chosen underbase ink can act as a sacrificial layer or physical blocker, preventing the fabric’s dyes from reaching the top ink layer.
Here are key tips on underbases and blocker inks:
- Use a Low-Bleed White as Underbase: One common method is to print a layer of low-bleed white ink, flash it, then print your colored inks on top of that. This white underbase helps seal off the fabric. If any dye does migrate, it will tend to mix into the underbase layer, not the top colors. For polyester prints, you would use a polyester-formulated white for this (not a regular cotton white). As ShirtSpace’s guide notes, “printing a white underbase on polyester garments can prevent dreaded dye migration”. Make sure to flash cure the underbase just enough that it’s dry to the touch, then quickly apply the top colors and do a full cure. Important: If you use a regular cure (320 °F) ink on top of a low-cure underbase, you’ll still end up heating everything to 320 °F anyway – defeating the purpose. So typically either use low-cure inks for all layers, or use a higher-temp blocker base that can handle full cure if you plan to put standard plastisol on top. Monarch’s low-bleed whites can be used as underbases and will withstand flash and hold the next layer nicely (they are formulated to have good inter-coat adhesion when flashed properly).
- Special Blocker Gray Inks: For the most severe dye migration cases (like printing on sublimated camo fabrics or “problem” polyester that bleeds profusely), many printers use a grey blocker ink as the underbase. Grey (or charcoal) blockers are plastisol inks with a ton of dye-blocking additives – the grey color comes from the chemicals/pigments that effectively neutralize dye. Monarch offers ULT Shield Grey, a dedicated dye blocker underlay ink. It was “designed specifically for dye-sublimated fabrics” and cures at ultra low 270 °F, creating a barrier without the usual fibrillation or rough feel of some blockers. Shield Gray (and similar products) have “ultra bleed-blocking power” – you print a layer of it first, then print your whites/colors on top of that layer. Monarch explicitly recommends using their Shield Grey underbase for “severe migration” scenarios. For example, if you have a red polyester that even low-bleed white is struggling with, a layer of Shield Grey beneath the white can stop the bleed completely. The grey color won’t show, because you print other ink over it; it’s purely there to absorb the dye.
- Underbase Application: When using an underbase, use a slightly lower mesh count screen (e.g. 110–125 mesh) for that base layer so you get a good, thick deposit of blocker ink. A lower mesh lays down more ink, which is what you want for a strong barrier. Ensure the print is smooth and fully covering the area where your top colors will go. Flash it just enough (excessive flash can cause the blocker to fully cure, and then the top layer might not adhere well). Then print your next layer(s) on top and cure everything once at the end. If done right, the underbase will enhance the vibrancy of the colors and prevent the fabric color/dye from altering the top colors’ brightness.
- “Blocking” Underbase vs. Regular Underbase: You might wonder, when do I need a special blocker vs. just using white? A rule of thumb: If the garment is lightweight 100% poly or known for bad bleeding, use the blocker grey. If it’s a poly/cotton blend or just mildly prone to bleed, a good low-bleed white underbase might suffice. Also, consider the design – if you’re printing light-colored elements or large white areas, you have to be extra cautious. For something like putting white text on a red polyester shirt, using a blocker underbase beneath the white text can save the day. For darker inks on a lighter garment, you usually don’t need a blocker at all (e.g. black ink on a light gray poly shirt won’t show bleed, even if technically some dye migrates, it’s not visible).
- Monarch’s Recommendations: Monarch Color suggests using a blocker under the print for extremely difficult garments that may bleed, to keep colors sharp and prevent any bleed-through. This aligns with industry best practices – it’s better to take the extra step on a troublesome fabric than to ruin an order. With Monarch inks, you could use ULT Shield Grey as mentioned, or even do a two-stage white underbase (print-flash-print of their low-bleed white, essentially creating a thicker barrier of white). The goal is simply to put something in between the fabric and your final ink layer that the dye will get stuck in, instead of traveling all the way to the surface.
In summary, underbases and blockers act as insurance for your print. They require an extra screen and step, but for jobs like printing on 100% poly or sublimated jerseys, they are often the difference between a clean print and a ruined one. As a beginner, don’t be afraid to utilize an underbase when needed – even seasoned pros rely on them for poly work. Just remember to use the correct type of ink for that underbase (low-bleed poly inks) and to not over-flash or over-cure it.
Monarch Color’s Formulations: How They Combat Dye Migration
Throughout this guide we’ve referenced Monarch Color’s plastisol inks as a prime example of dye-migration-fighting ink technology. Let’s highlight why Monarch inks are well-regarded for this issue and how their characteristics help you as a printer:
- Ultra Low Curing Temperatures: Monarch was one of the early companies to focus on low-temp curing plastisol for apparel. Their inks like the ULT series whites cure at 270–280 °F, which is below the dye activation point for polyester. By curing so low, Monarch inks let you skip the danger zone (around 300 °F) where dyes start migrating. This is a huge advantage – it directly tackles the root cause. Even their mixing colors in the Apocalypse line are formulated to cure at around 280 °F for use on heat-sensitive fabrics.
- Built-in Dye Blockers: Monarch’s polyester inks have exceptional bleed resistance built in. For instance, Monarch ULT (Ultra Low Temp) White is specifically described as having “high bleed resistance” and “no ghosting” on poly. “No ghosting” refers to preventing the phenomenon where dye gas can even create a shadow or transfer onto other parts of the shirt during curing – a sign that the ink is trapping and locking down the dye effectively. The ULT3 White boasts “excellent bleed-blocking” in its specs. Essentially, Monarch loads these inks with chemistry that either absorbs the migrating dye or chemically blocks it from altering the ink color. The result is that even on nasty fabrics, prints made with inks like Yeti ULT II/III White stay bright and true to color.
- High Opacity Pigments: All of Monarch’s plastisol inks are known for high opacity and brightness. Their whites (e.g. Stark White, Yeti White) are some of the brightest on the market, and their colors in the Apocalypse series also tout outstanding coverage. High opacity means you get great coverage over dark fabrics, but it also means a thicker pigment wall to resist dye. If an ink is translucent, any dye that migrates will easily show. Monarch’s inks lay down opaque so that even if a bit of dye sneaks in, the color shift is minimal or unnoticeable. This opacity often allows one-hit coverage, reducing the need for multiple strokes or layers (fewer layers = less total time heating the garment, which also helps reduce dye migration opportunities).
- Soft Hand, Short Body Formulation: A challenge with some low-bleed or poly inks from other brands is they can be thick, gelled, or hard to print, especially through fine mesh – basically tough to work with. Monarch tackled this by formulating their inks to be “soft and creamy” and short-bodied. Short body means the ink settles quickly after you sheer it with the squeegee, which gives a smooth surface. This helps with printing through higher mesh counts if needed and gives a nicer feel on the shirt. A softer ink also doesn’t sit as heavy on the garment, so you get good dye blocking without a bulletproof patch. Beginners will find Monarch inks relatively user-friendly to print: they often don’t require viscosity modifiers or tons of force to clear the screen. And a smoother ink layer can actually trap dyes more uniformly (some very rough underbases allow dye to creep through the textured spots).
- Versatility (Print on Any Fabric): Monarch’s low-bleed inks are generally designed to be usable on various fabric blends. For example, the ULT white is said to work on “virtually any fabric” – polyester, tri-blends, cotton, etc.. This is helpful because you don’t have to switch inks if you have a job that has mixed garment types. You could potentially use the same ink on a 50/50 hoodie and a 100% poly jersey (just adjusting cure temp accordingly). If a garment isn’t prone to bleed (like cotton), Monarch notes you can cure their low-temp inks at standard temps too without issue – they’re flexible. However, when used at low temp on polys, they drastically reduce bleed problems by not igniting the dyes. That flexibility is nice for a small shop; one ink can cover lots of bases.
- Support for Custom Colors: One reason some printers avoid poly inks is the limited color selection. Monarch solved that by offering the Apocalypse LB Mixing System, which lets you mix any Pantone color in a low-bleed formula. So if you need a specific school color or corporate Pantone printed on polyester shirts, you can mix it with their system and still have the low-cure, low-bleed properties. This is a bit more advanced, but it’s good to know as you grow – you’re not stuck with just stock colors if you choose Monarch. They even provide software and formulas to get the match.
In essence, Monarch’s plastisol inks are formulated from the ground up to combat dye migration through lower curing requirements, integrated bleed blockers, high opacity, and ease of use. This is why many printers have gravitated to products like Monarch Yeti ULT White or Apocalypse series inks when tackling tough polyester jobs. As a beginner, using these inks can give you a safety net – they forgive some of the heat issues and proactively prevent problems, letting you focus on technique.
Now, let’s put it all together with some practical best practices for printing on those challenging fabrics and review common pitfalls to avoid.
Best Practices for Printing on Polyester, Blends, and Sublimated Garments
When you’re faced with printing on a garment that is likely to bleed (like 100% poly or a poly-rich blend), it helps to follow a checklist of best practices. Here are some guidelines to ensure your prints come out crisp and migration-free:
- Select the Right Ink for the Job: This is step one. Use low-bleed, polyester-friendly plastisol inks – ideally the kind that cure at low temperature. For a 100% polyester shirt or a polyester/spandex athletic jersey, choose an ink like Monarch’s ULT series or Apocalypse series designed for those fabrics. For 50/50 or 65/35 poly/cotton blends, you may get by with a standard cure low-bleed ink (like Monarch Stark White LB), but using the low-cure inks provides extra insurance. Avoid using regular cotton plastisol on poly; it likely will bleed and make a mess of your print.
- Control Your Curing Temperature: Set your conveyor dryer or heat press to the lowest temperature that will still fully cure the ink. If using a low-temp ink, that could be around 270–280 °F. For standard poly inks, around 300–320 °F (but try not to exceed 320). Do not crank the heat higher “just to be safe” on curing – excessive heat is actually unsafe for dye migration. It’s better to slow your belt and give a slightly longer dwell time than to overheat the garment. Always test cure a sample shirt with a thermometer or donut probe to ensure you’re hitting the ink’s cure temp.
- Use an Underbase on Dark Poly: If printing light colors or detailed designs on very dark or saturated polyester, print a white or blocker underbase first. This applies to things like white ink on red/black poly, light blue on red poly, etc. A low-bleed white underbase (flashed) will greatly reduce dye migration into the top colors. For extreme cases (e.g. printing white on a fully sublimated dark camo pattern), use a specialized blocker grey underbase for maximum protection. The underbase technique might not always be necessary on blends or lighter colors, but when in doubt, it’s worth the extra step.
- Avoid High Flash/Stack Temperatures: Keep your flash curing quick and cool – just enough to gel the ink. Also, after final curing, let the shirts cool down before stacking them on top of each other. A common mistake is tossing hot polyester shirts in a stack; the trapped heat can cause dye to gas out and create a “ghost” image on the next shirt or further dye migration as they sit. Some printers use a small fan at the dryer exit or make multiple smaller stacks to help cooling. Essentially, don’t sandwich hot shirts together – give them a moment to air out.
- Choose Lower Mesh and Proper Squeegee Technique: When printing your base layer on poly, using a lower mesh screen (110–156 mesh) can lay down a thicker, solid layer of ink that blocks dye better. Use a sharp squeegee and a firm flood stroke to get good coverage. Aim for one good print stroke that deposits enough ink rather than multiple hits (multiple strokes can overwork the ink and also keep heating the fabric under flash multiple times). A single, smooth stroke for opacity is ideal.
- Keep the Ink Layers to a Minimum: The more times you heat the garment, the more chance for dye to migrate. So design your print process to be efficient. If you can accomplish the print in one or two print strokes (with an underbase and a top color, for example) that’s better than doing, say, three flashes and four print layers. Each flash/cure is heating the polyester again. Using highly opaque inks like Monarch’s helps here, because you don’t need multiple hits to get coverage.
- Test Your Garment if Possible: Not all polyester is created equal – some brands bleed far more than others. When working with a new garment, do a dye migration test on a sample first. One simple test is to print a square of white ink on a scrap of the fabric and run it through your dryer, then observe after 24-48 hours. If it’s still bright white, you’re likely okay; if it turned pink or yellowish, you know you’ll need a blocker. (Monarch even sells a Dye Bleed Test Kit for this purpose, which simulates bleed by keeping printed swatches at elevated temperature for days.) Testing might seem like extra work, but it can save you from ruining an entire batch of shirts. As ShirtSpace’s article advises: “TEST, TEST, TEST” – print a sample, wait 72 hours, and see if any dye migration occurs.
- Mind the Garment Itself: Sometimes, prevention is better than cure – literally. If you have flexibility, try to source better garments that are less prone to bleeding. Modern “low-bleed poly” blanks do exist (some manufacturers advertise pre-treated polyester shirts for printing). Also, lighter-colored polyester garments don’t show migration as a darker ones do. Of course, often you’re stuck with whatever color the job calls for – but it’s worth noting: if you have a client open to it, say printing light grey shirts instead of white ink on black poly, that can avoid a lot of trouble because the contrast is lower. In general though, assume any dark poly is a bleeder and proceed accordingly with inks and process.
- Stay Organized and Consistent: With poly printing, consistency is key. Maintain a steady dryer temp once you dial it in – don’t constantly fiddle or you might accidentally spike the heat. Keep your flash times consistent. If you pause printing, be cautious that your press platens or flash unit hasn’t overheated the shirt sitting there (that residual heat can start dye migration even before final cure!). Try to print and move shirts in a smooth, efficient rhythm to minimize unnecessary heat dwell.
By following these practices, you’ll greatly increase your success rate on challenging fabrics. Even as a beginner, you can produce excellent results on polyester if you respect the heat sensitivity and use the right tools (inks) for the job.
Common Mistakes to Avoid
Finally, let’s cover some common mistakes in plastisol printing that can lead to dye migration issues. Being aware of these will help you steer clear of potential pitfalls:
- Using the Wrong Ink: Perhaps the number one mistake is using standard plastisol ink on polyester and expecting it not to bleed. Regular inks have no dye blocking capabilities. Always match your ink to your fabric – for poly or blends, use low-bleed inks. If you print cotton ink on a polyester shirt, it will likely bleed once it hits the dryer. Don’t learn this the hard way!
- Over-Curing (Excessive Heat): As we’ve emphasized, too much heat is dangerous. Avoid cranking your dryer much above the recommended cure temp or running shirts through multiple times. Over-curing can actually force dyes to migrate that otherwise might not have. Plus, it can scorch or damage the fabric. Use a timer or heat probe to ensure you’re not baking the garment. Remember, heat is the enemy – use just enough to cure, and no more.
- Under-Curing (Incomplete Cure): On the flip side, don’t under-cure your ink out of fear of heat. If plastisol ink is under-cured, it will result in poor wash durability – the print might crack or wash out. Undercured ink might also be softer, which could ironically allow dye to penetrate it more easily over time. Follow the ink’s cure specifications closely (time and temperature). A properly cured ink forms a solid matrix that is better at encapsulating pigments (and any intruding dye). So find the sweet spot: fully cure the ink, but at the lowest temp feasible.
- Neglecting to Flash Correctly Between Colors: If you’re doing a two-layer print (like white underbase + top color), improper flash technique can cause issues. Over-flashing (too hot/long) might fully cure the underbase, making it hard for the top layer to stick, or it could cause dyes to start bleeding before the second layer is down. Under-flashing (too little) might cause the underbase to mix into the top colors. Follow guidelines: flash just until no ink transfers when lightly touched. If you see ink on your finger or the surface is glossy and wet, flash a bit more. If the underbase is beginning to crack or feels “cooked,” flash less. Dialing in flash is critical for multi-layer poly prints.
- Skipping the Underbase/Blocker on a High-Risk Garment: Sometimes in a rush, a printer might think, “Maybe this poly won’t bleed, I’ll just do one hit of white and call it done.” This gamble often backfires – the shirt that “looked fine” on press might turn pink by the next morning. It’s a mistake to skip an underbase or blocker when everything about the garment/color suggests you need one. If you know a certain fabric or color is notorious (say, safety neon polyester, or sublimated prints), don’t skip the blocker. As one saying goes: an ounce of prevention is worth a pound of cure. It’s far easier to prevent dye migration with an underbase than to try to fix it after the fact (which is usually impossible – once migrated, the stain is permanent).
- Stacking or Covering Hot Shirts: We touched on this, but it’s worth repeating as a common mistake: piling up hot garments. If you take shirts right off the dryer (still hot) and put them in a box or stack, you’re essentially creating an incubator for dye migration (and even ghosting onto neighboring shirts). The residual heat can continue to draw out dye for several minutes. The simple fix is to catch the shirts at the dryer and lay them out or tumble them gently so they cool a bit. If stacking, make small stacks and rotate adding to each, giving time for cooling. Never immediately polybag a hot shirt either – that traps heat and moisture and can cause sublimation/bleed inside the bag.
- Contaminating Low-Bleed Inks: Be careful to use clean tools and buckets when working with your low-bleed inks. If you use a stir stick or spatula that had regular ink on it and mix it into your poly ink, you might accidentally introduce some dyes or chemicals that reduce the ink’s bleed resistance. Similarly, adding reducers, soft-hand bases, or other additives that are not recommended can compromise the ink’s formula. Monarch’s tech sheet explicitly warns that additives may affect the ink’s ability to stop dye migration. So use the ink straight if possible, or only add manufacturer-approved modifiers in the recommended amounts. Keep your containers covered when not in use to avoid any dust or stray ink mixing in.
- Assuming “Blends Don’t Bleed”: A newbie might think that if a shirt is only 50% polyester, it won’t have dye migration. This can be a mistake – many 50/50 blends will still cause some bleed (perhaps less, but enough to dull a white print). The dye type matters more than the percentage; some 50/50 shirts use the same aggressive dyes as 100% poly. So treat blends with caution too, especially dark blends. Use low-bleed ink on them if printing light colors, and test if unsure. On the other hand, 100% cotton and 100% nylon generally do not have dye migration problems – so save your expensive poly inks for when they’re needed.
- Panic Curing: This is a term for when printers, worried about ink adhesion, run a shirt through the dryer multiple times or at an excessive setting “just to make sure it’s cured.” It’s understandable to want a good cure, but doing a second or third pass in the dryer at high temp is a recipe for dye migration. If you’re not confident in the cure, adjust your settings (lower temp, longer time) rather than blasting it repeatedly. Use a test shirt with a stretch test or wash test to verify cure, rather than cooking the actual order pieces repeatedly.
By avoiding these mistakes, you’ll set yourself up for success. Screen printing has a learning curve, but being mindful of these common errors will accelerate your progress and help you produce professional-quality prints even on tricky fabrics.
Conclusion
Dye migration might seem intimidating at first, but with the right knowledge and tools, it’s a challenge you can overcome. To recap the key points:
- Understand the cause: Polyester dyes sublimate at high heat and can tint your plastisol inks. Keep that in mind with every decision (ink choice, curing temp, etc.). Heat is the trigger, so control the heat.
- Use proper inks: Invest in good low-bleed, low-cure plastisol inks, like those from Monarch Color’s polyester-specific lines. They are formulated to block dye and cure at lower temperatures – a lifesaver on poly shirts. The slightly higher cost of poly inks is well worth it when you compare to the cost of ruined shirts or unhappy customers.
- Manage curing carefully: Dial in your dryer temperature to just cure the ink and no hotter. If possible, cure at 270–280 °F with low-temp inks to all but eliminate most migration issues. And don’t over-flash or over-bake during production.
- Use underbases/blockers for tough jobs: When in doubt, print a blocker underbase (white or grey) to protect your print. This extra step can make the difference on extreme cases like sublimated fabrics or very bleed-prone material.
- Adopt best practices: Little things – cooling shirts, testing fabrics, using the right mesh, etc. – all contribute to a successful outcome. Printing on polyester might require a bit more attention to detail than printing on cotton, but it’s completely doable with a systematic approach.
- Avoid shortcuts that backfire: We went through common mistakes; avoiding those will save you headaches. For example, don’t assume something won’t bleed – be proactive and treat it as if it will, and you’ll never be unpleasantly surprised.
As a beginner screen printer, mastering these techniques will allow you to confidently take on jobs involving performance wear, team uniforms, or any synthetic garments. Monarch Color’s plastisol inks, with their low-temperature curing and built-in bleed resistance, can be an excellent ally in this learning process – they mitigate many issues and help ensure your prints stay as bright and crisp as you intended.
Happy printing, and remember: always test your process if you’re unsure, and don’t hesitate to use the tools (and inks) designed to make your life easier. With time and experience, avoiding dye migration will become second nature, and you’ll impress your clients with vibrant, durable prints on even the toughest fabrics!